Here’s a number that should stop you in your tracks: the median completion rate for online courses is just 12.6%.

That means for every 100 students who enroll in the average course, roughly 87 of them never make it to the end.

Most creators respond to this by blaming the student. “The student wasn’t motivated enough” or “Life got in the way.” But the truth is less comfortable: most online courses are designed in a way that makes dropping off easy and finishing hard. There’s no community, no accountability, no reason to log back in once momentum fades.

This guide is for creators who want to build their programs differently. You’ll get a full step-by-step process for creating an online course that attracts the right students, delivers real results, and keeps people engaged – from the first lesson to the last.

Key insights:

  • The median online course completion rate is just 12.6%; courses backed by an active community can reach as high as 90%.
  • Validating your idea before you record a single lesson is the most underrated step in course creation.
  • Outcomes-focused design, starting with what students will actually be able to do by the end of the program, produces better courses and better conversions.
  • Your course platform choice isn’t just a hosting decision; it determines how students engage, how much they complete, and how much revenue you earn.


Before we get to the ten steps, you might also want to watch this short video that ranks the best and worst digital products to sell, including online courses. Hint: it’s good news! Watch it here. 

Step 1: Choose a course topic worth paying for

The right course topic sits at the intersection of three things: what you know well, what people are actively searching for, and what someone will hand over money to learn. Miss any one of those three, and you’ve got either a course no one finds, a course no one buys, or a course that teaches well but can’t compete.

Here’s how to nail the topic:

  • Validate with search data before anything else. Use a keyword research tool to check whether people are actively searching for your topic. Consistent search volume means there’s existing demand you can tap into. No search volume means you’d be creating demand from scratch, which is much harder, but not impossible, to solve.
  • Niche down more than feels comfortable. “Email marketing” is too broad to compete on and too vague to convert. “Email sequences for service providers who want to book more discovery calls” is specific, searchable, and exactly what someone will pay $297 to learn. Specificity wins.
  • Look for transformation, not information. People don’t buy courses to know things; they buy them to change something. The topics that convert consistently are the ones with a clear ‘before’ and ‘after’ state: for example, physical results, business outcomes, career advancement, and creative skills.


Topics that sell well across course platforms include:

  • Business and marketing skills (copywriting, social ads, and lead generation)
  • Creative skills (photography, design, music production, and video editing)
  • Health and fitness (nutrition, workout programming, wellness, and habit change)
  • Professional development (tech skills, certifications, and career transitions)


If you’re already an expert with real-world experience, you’ve got the raw material. This step is just about shaping it into something the market is already looking for.

→ RELATED READING TO DOWNLOAD TODAY | ‘The New Skills Economy: How Creators Are Redefining Specialized Professional Learning

Step 2: Validate the idea before you build anything

Building a full course before testing whether people will pay for it is the most common and most expensive mistake in online education. You can spend months creating content and then launch to silence. Validation prevents that.

Here are three ways to test your idea before recording a single lesson:

  • Pre-sell page: Build a simple landing page that describes the outcome, the student it’s for, and the transformation it delivers. Drive traffic to it and track how many people join a waitlist. A few dozen qualified signups from a cold audience is a meaningful signal.
  • Paid pre-order: Take actual payment before the course exists. If 10-20 people will pay for something that isn’t built yet, the idea has legs. If you can’t get 10 people to pay, adding more content won’t fix that problem.
  • Free mini-module: Release one lesson or a short email series on the core topic. Track engagement, watch for replies, and pay attention to whether people ask for more. Genuine interest shows up in behavior, not just intent.


The practical advantage of starting here is that it also builds your audience before launch day. A waitlist of 200 engaged people beats a launch to cold traffic every time.

With the right checkout setup, pre-selling is straightforward. You don’t need a finished course to collect payment. You need a clear offer, a payment page, and a credible commitment about when the course will be ready.

→ DISCOVER MORE PRE-SELLING ADVICE FROM A 7-FIGURE SELLER | ‘From Burnout to $3 Million: How a Photographer Quit Her Camera and Built a Coaching Empire With ThriveCart

Step 3: Define your learning outcomes first, then build backwards

Most course creators sit down, think about everything they know, and start recording. The result is a course that covers a lot of ground but delivers unclear results. Students feel busy but not actually better off.

This kind of outcomes-focused backward design flips the process. You start with what students will be able to do (and/or what they’ll know) by the time they finish, and then you build the content that gets them there. The concept of backward design in curriculum planning was popularized by Jay McTighe and Grant Wiggins in their book Understanding by Design. Their research shows that backward design produces more cohesive, outcomes-aligned learning experiences than content-first approaches. 

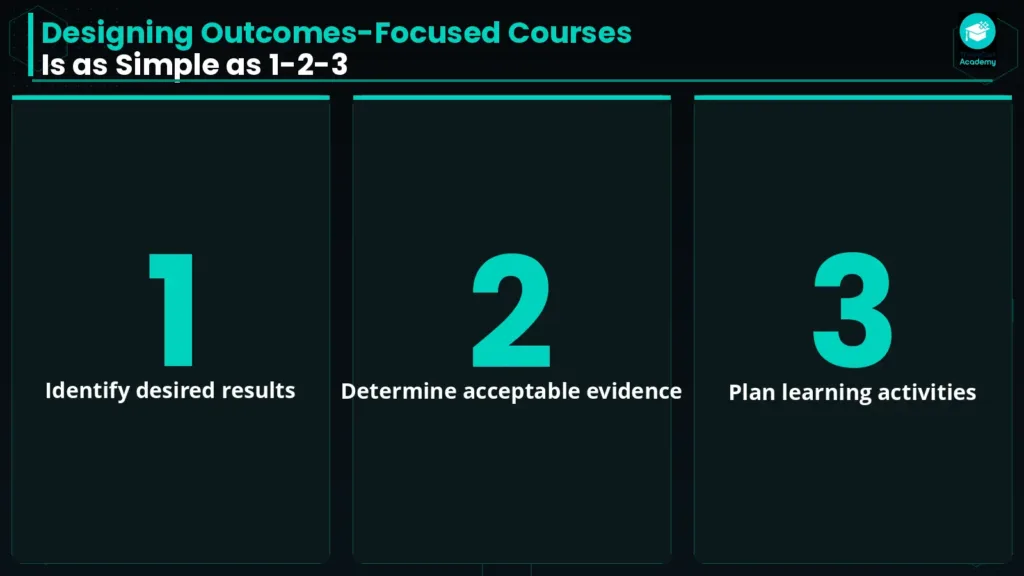
The model involves a simple three-stage process:

  1. Identify desired results
  2. Determine acceptable evidence
  3. Plan learning activities


A diagram listing the 3 steps to design outcomes-focused courses. The images shows the numbers 1-3 and lists the steps as:

Identify desired results
Determine acceptable evidence
Abd plan learning activities

Here’s how to apply it:

  • Write outcomes using action verbs. “By the end of this module, students will be able to write a three-email welcome sequence that generates replies” is a usable outcome. “Students will understand email marketing” is not. Vague outcomes don’t help you build the right content, and they don’t help students track their own progress.
  • Map each outcome to a module and each module to a set of lessons. If a lesson doesn’t connect to a measurable outcome, it probably shouldn’t be in the course.
  • Ask “what does my student need to do to achieve this outcome?” not “what else do I know about this topic?” The second question delivers bloated courses. The first makes useful ones.


The more specific your outcomes, the easier it is for students to see they’re making progress, and progress is the single biggest driver of course completion.

→ RELATED READING TO DOWNLOAD TODAY | ‘From Likes to Leverage: How Lifestyle Creators Can Build Real Revenue Beyond Algorithms

Step 4: Structure your content into modules and lessons

With your outcomes mapped, you can build the course architecture. Think of modules as chapters and lessons as the individual pages within each chapter.

Choose a format based on scope:

  • Mini-course (1-2 hours): Great as a lower-priced entry point, a lead generation tool, or a proof of concept. Typically 2-3 modules with 3-5 lessons each.
  • Multi-week course: The most common format for a signature offer. Usually 4-8 modules with 5-8 lessons per module, spread over several weeks.
  • Flagship or mastermind course: Deep transformations that take months. Premium priced, and often includes community access, live calls, and accountability components.


Lesson design best practices:

  • Keep videos under 10 minutes. One concept per video is a good rule. If you’re tempted to cover two things in the same recording, split it.
  • Mix content types: video, text, audio, downloadable worksheets, and quizzes. Different students learn differently, and variety reduces the “I’ll come back to this later” drop-off.
  • Make text lessons scannable with short paragraphs, subheadings, and bullet points. A wall of text in a course lesson is almost always skipped.
  • Use quizzes strategically to reinforce key concepts, create a sense of achievement, and unlock certificates or the next module.

→ MORE FROM THE BLOG | ‘5 Best Checkout Systems for Creators Selling Courses, Coaching & Digital Products

Step 5: Choose the right course platform

This is the decision most creators underestimate. Your platform isn’t just where your videos live. It determines how students experience your course, how they interact with you and each other, and how much revenue you generate per student.

What to look for:

  • Native checkout, not bolted on. Stitching together a separate course tool, a community platform, and a checkout processor can easily cost $200+ per month before a single student pays you. And every extra step in the purchase journey loses conversions.
  • Community features built in. The data is consistent: students who are part of an active community are far more likely to finish a course. When students can ask questions, get support, and see that others are on the same journey, they stay engaged. Without that, they disappear.
  • Progress tracking and analytics. Lesson-level completion data shows you exactly where students drop off. That’s not a vanity metric; it’s a product improvement tool.


ThriveCart Academy brings courses, community, and checkout together in one platform. Instead of managing separate subscriptions and integrations, you get a single environment where students land in an activity feed, not a static course player. That shift in how students experience your content changes how they engage with it.

Here’s what that looks like in practice:

  • Students feel like they’ve joined a community, not just purchased a product.
  • The activity feed brings them back between lessons because there’s always something new to engage with.
  • Completion rates on community-backed courses like those hosted in ThriveCart Academy reach 85-90% completion rates, compared to the 12.6% industry median. 
  • According to ThriveCart’s own benchmark data, checkout infrastructure built into the platform delivers up to 118% higher average order value through full funnel utilization, including order bumps, upsells, and downsells.


Standalone community platforms like Circle can add $89-$199 per month on top of your course platform and checkout fees. Before you pay for three separate subscriptions, it’s worth asking whether a single platform that handles all three might be both cheaper and better for students.

A teal CTA button with the words 'Create courses & communities with ThriveCart Academy'

→ COMPARE COURSE & COMMUNITY PLATFORMS | ‘ThriveCart Academy vs Circle: Which Community Platform Is Right for Course Creators?

Step 6: Price your course for what it’s worth

Underpricing is often the default move for new course creators, and it almost always backfires. A low price signals low value, attracts students who aren’t committed, and makes it harder to raise prices later without friction. Course prices will vary by type, industry, demand, and other factors, but here’s a rough framework:

  • Mini-course ($47-$147): Entry-level offers, introduction to a topic, or conversion from free content to paid.
  • Short course ($197-$497): Skill-focused, structured modules.
  • Signature course ($497-$2,000+): Your core offer; a structured, outcome-focused transformation.
  • Flagship or mastermind ($1,000-$5,000+): Premium; often includes live coaching, private community access, and accountability.


How to justify higher course prices:

  • Transformation: The more specific and valuable the result, the higher the price ceiling.
  • Community: Students who join an active community alongside a course get ongoing support, not just video content, and that’s worth more.
  • Accountability: Cohort-based delivery, live Q&A, or regular check-ins add real value that justifies a premium.
  • Certificates: Formal recognition of completion carries perceived value, especially in professional topics.


Pricing architecture matters beyond the headline number too. Order bumps (a related resource added at checkout), upsells (offering a higher tier after purchase), and payment plans (splitting a $997 course into three payments or Buy Now, Pay Later solutions like ThrivePay Installments) can each meaningfully increase revenue per student without discounting the core offer.

→ EXPLORE MORE | ‘Create Real Urgency, Earn More Sales: A Quick Guide to ThriveCart Countdown Timers

Step 7: Build the course content

You don’t need a professional recording studio to create a course people love. Here’s what actually matters:

Equipment basics:

  • A recent smartphone shoots 4K video. That’s enough to start.
  • Audio quality matters more than video quality. A basic lapel lavalier microphone ($15-$35) eliminates background noise and dramatically improves the perceived production value of your content.
  • A plain background or a tidy desk works fine. Your expertise is what students are paying for.


Recording tips:

  • Keep individual takes short. It’s far easier to edit five two-minute takes than one rambling ten-minute take.
  • Cut aggressively in editing. Dead air, filler phrases, and tangents lose students fast.
  • Add captions to every video. They improve accessibility and increase the number of students who watch all the way through.


Lesson completion mechanics:

On ThriveCart Academy, a video is marked complete when a student has watched 80% of it. Text lessons require the student to scroll to the bottom. These aren’t arbitrary settings; they’re designed to track genuine engagement rather than passive clicks, so your completion data actually reflects what’s happening.

How to use quizzes effectively in courses:

  • Place quizzes at the end of modules, not just lessons.
  • Use them to reinforce the most important concepts from each section.
  • Gate certificates behind quiz completion so there’s something tangible to work toward.
  • Consider unlocking the next module after a student passes a quiz to create a sense of earned progression.

Step 8: Launch with a community built in, not bolted on

Here’s what happens in most courses: students watch the first two lessons with real enthusiasm, hit a moment of confusion or friction, and never come back. There’s no one to ask, no sign that other people are on the same journey, and no reason to return except willpower. 

But willpower alone doesn’t sustain a 10-hour course.

Community changes that dynamic. There’s plenty of evidence to support this, including an often-cited case from Harvard Business Review. It jumped from single-digit to over 85% course completion rates after switching its training programs from stand-alone Massive Open Online Courses (MOOCS) to social learning.

Here’s what that number means for you: The environment around the course matters as much as the content inside it.

How to structure your community in ThriveCart Academy for launch:

  • Start with at least two spaces: an Announcements Space for updates and milestones, and a Q&A Space for questions and discussion. These two alone are enough to create a functioning community on day one.
  • Use gamification from the start. Experience points, leaderboards, badges, and streaks aren’t decorative. They create behavioral loops that bring students back. When someone sees their name on a leaderboard or earns a badge for finishing a module, they have a concrete reason to keep going.
  • Make the activity feed the student homepage. Unlike most other community platforms, in ThriveCart Academy, students land in the community feed when they log in, not a course player. They see peer activity, new discussions, and announcements before they even think about which lesson to open next. That small architectural shift drives a big difference in engagement.
  • Show up yourself. Especially in the first few weeks after launch, your presence as the creator signals that this is a real, living community, not a self-service product library.

→ WHICH ONE WINS? | ‘ThriveCart Academy vs Skool: The 2026 Comparison for Course Creators and Community Builders

Step 9: Market and sell your course

Great content doesn’t market itself. Here’s a practical launch framework for independent creators:

Pre-launch (2-4 weeks before opening cart):

  • Build an email waitlist. Email consistently outperforms social media for course sales.
  • Invite a small group of beta students to go through the course first. Their results become your most powerful sales tool.
  • Use early-bird pricing as a genuine incentive for the first cohort, not as a fake countdown timer people can see through.


Launch week:

  • Send a 5-7 email sequence covering: the problem you’re solving, the transformation your course delivers, proof (student results or your own story), answers to common objections, and a clear deadline.
  • Share behind-the-scenes content on social media: student milestones, community activity, early results.
  • Run paid ads (Google or Meta) only once you’ve validated the offer organically. Paid traffic is a multiplier, not a fix.


Post-launch and ongoing:

  • Build an affiliate program. Students who get real results and can earn a commission for referring others become your most effective distribution channel.
  • Use testimonials and case studies from your community. Real student results close more sales than any feature description.
  • Run the course again. The second launch should outperform the first, and the third should beat the second. Better testimonials, a refined funnel, and a growing affiliate network compound over time.


ThriveCart’s checkout infrastructure handles affiliates, payment plans, and upsells natively, so the post-launch revenue system doesn’t need separate tools or integrations.

→ SEE IT IN ACTION | ‘The Freedom Formula: How Rob Cornish Turned Redundancy Into $41,000 a Month in Recurring Income

Step 10: Improve your course using student data

Launching isn’t the finish line. It’s when the real data starts to come in.

What to track:

  • Lesson-level completion rates: If 85% of students finish lesson 4 and 40% finish lesson 5, something breaks at lesson 5. It’s your job to find out what: is it too long, too confusing, or does it arrive at a point of friction in the learning journey?
  • Q&A Space questions: The questions students ask repeatedly tell you directly where the content is confusing, incomplete, or missing a step.
  • In-course surveys: A short survey after module 3 or 5 gives you structured feedback while students are still engaged and the learning experience is fresh.


When to update vs. when to rebuild a course:

This question comes up a lot. Here’s a guideline to follow. You should:

  • Update a lesson when multiple students report confusion about the same concept
  • Refresh examples, case studies, and statistics annually to keep the content current and credible
  • Add a new module when student questions consistently point to a gap you haven’t addressed
  • Consider a full relaunch if the transformation you’re teaching has fundamentally changed or if your course was built before you validated outcomes clearly


On the community side, ThriveCart Academy’s Community Health Score gives creators a live metric across four dimensions: Engagement, Retention, Learning, and Support. Instead of guessing whether your community is healthy and your students are on track, you’ve got a dashboard that shows you exactly where to focus your attention.

→ START BUILDING BETTER COMMUNITIES TODAY | ‘10 Best Practices for Building a Creator-Led Community That People Actually Stick Around For

FAQS

Q: How long does it take to create an online course?
A: It depends on the length and complexity, but as a general benchmark: creating one hour of finished eLearning content takes approximately 10-20 hours of development time. A basic 5-hour course could realistically take 50-100 hours to build, spread across several weeks. A focused mini-course with 4-5 short lessons could be ready in a weekend if you already know the material well.

Q: How much does it cost to create an online course?
A: At the DIY end, a smartphone, a basic lapel microphone, and a course platform subscription is genuinely all you need. That can be as little as a few hundred dollars. At the professional end, hiring video editors, a course designer, and a copywriter for sales pages can push costs to $5,000 or more. Your ongoing platform costs matter too: a bundled platform that includes checkout, community, and course hosting in one subscription is typically far more cost-effective than paying for three separate tools.

Q: Can you create an online course for free?
A: You can get very close. Most platforms offer a free trial, your existing phone handles recording, and free editing tools like DaVinci Resolve or CapCut handle post-production. That said, “free” usually means limited features or a revenue share. For a course you’re building to sell and scale seriously, investing in the right infrastructure from the start pays for itself quickly.

Q: What makes students actually finish an online course?
A: Three things: short, clear lessons; visible progress; and community. Students who can see they’re making progress through completion bars, badges, or experience points, and who are surrounded by peers on the same journey, are far more likely to finish. That’s why community-backed courses typically reach completion rates of 85+%, compared to the 12.6% median for solo self-paced study.

Q: How do you sell an online course once it’s built?
A: Email marketing is the highest-converting channel for course sales, consistently. Build your list before launch, run a structured launch sequence, and layer in affiliates and testimonials after. Paid ads work well once you’ve validated the offer organically first. Don’t overlook checkout architecture either: order bumps, upsells and downsells, payment plans, can significantly increase what you earn per student without requiring more traffic.

→ KEEP READING | ‘How to Create a High-Converting Sales Funnel (Beginner-Friendly Guide + Templates)

Build a course business, not just a course

Most creators think of a course as a product. The ones who build lasting businesses think of it as a system: a topic that’s validated, outcomes that are clear, content that’s structured for completion, a community that keeps students engaged, and a checkout that maximizes what every student is worth.

Get any one of those pieces wrong, and the whole thing leaks. The platform choice alone can mean the difference between 12.6% completion and 85%, between a one-time sale and a student who buys your next course, refers a friend, and stays in your community for years.

ThriveCart Academy is built for creators who want all of it in one place: courses, community, gamification, quizzes, moderation, forums, and checkout, without the overhead of stitching together separate tools. If you’re ready to build a course that students actually finish, start your free free trial of ThriveCart Academy.

See the power of courses and communities, alongside gamification, quizzes, certificates, badges, leaderboards, and native video hosting.

A teal CTA button with the words 'Get ThriveCart Academy'

Other articles you might find interesting

Introducing ThriveCart’s New Monthly Pricing Model: More Flexibility, Same Revenue-Boosting Power 

ThriveCart now offers monthly pricing, giving merchants the flexibility to try the platform, see results, and grow with confidence – without a lifetime commitment on ...
Read Article

From 9-Hour Call Days to $60K Passive Months: Melanie Aubert’s ThriveCart Story

From burnout to $3 million: how Melanie Aubert quit the launch grind and built a passive income empire with ThriveCart
Read Article

ThriveCart Platform Enhancements: May to July 2026 

At ThriveCart, we believe a great platform isn’t just about new features – it’s about making sure everything works the way it should. That means ...
Read Article

How to Sell PDFs Online: A Step-By-Step Guide for Creators

Learn how to sell PDFs online in six simple steps. Choose the right platform, price your PDF, set up your checkout, and start getting paid. ...
Read Article

Ready to grow your business with ThriveCart?

Whether you’re launching your first offer or optimizing your 10th funnel, ThriveCart gives you the tools, control, and leverage to grow a business that’s built to last.